Monday, January 2, 2017

Running CUDA on Microsoft Azure

Microsoft recently added virtual machines to their lineup which have NVIDIA graphics cards accessible to them. This allows you to run intense computation loads in the cloud. Traditionally, a cloud server would have to send data down to a company's server to run CUDA code. The company's server could then send the results back up to the cloud.

With the introduction of CUDA in Azure, all of this can be done in the cloud! This is a tutorial on how to get it to work.

First, go to your Azure portal (portal.azure.com) and begin to create a new Ubuntu server.

Next, click on the "Create" button.


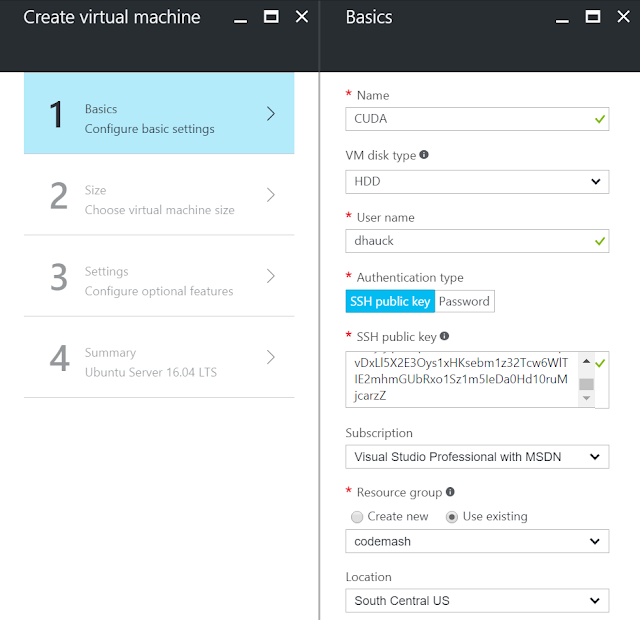
We then need to generate an ssh key pair. There are many different programs that can be used to generate this key pair. Personally, I use Bash on Ubuntu on Windows with "ssh-keygen." A tutorial to get Bash running on Windows can be found here:  https://msdn.microsoft.com/en-us/commandline/wsl/install_guide.

Fill in all the rest of the basic information however you would like, however at the time of this blog post the location must be South Central US.


For the VM size, you will have to select "View all" in order to see the virtual machines with NVIDIA cards.


The virtual machines we want to select are the "N-Series." This pretty much means any VM that begins with the letter N. For this example, I will just be using the least expensive option with a single K80 GPU.


After this, everything else should be set up fine on your VM. Leave the settings the same and select "OK" on the Summary screen.

Now your VM should be all set up! We're going to ssh into it now. In your Azure portal, check the DNS name label for your new VM.


Now take your private key that you generated earlier, rename it to id_rsa, and copy it to ~/.ssh/id_rsa. Using "ssh {myserver}.southcentralus.cloudapp.azure.com" should connect you to your new VM! Now we just need to install CUDA.

Go to the CUDA download site:https://developer.nvidia.com/cuda-downloads. Go for the Ubuntu debian (local) version.


Now you can either download the file and transfer it to your VM via scp, or you can download it directly from the VM with wget. Once it is on your VM, follow the installation directions above, using dpkg and apt-get to install CUDA.

Installing CUDA may take a few minutes. When it is done there is just one step left to get CUDA working. Let's add nvcc to our path so we can easily run it. Once this is done, we officially have a cloud VM with CUDA on it!! Now let's have it run some CUDA code.

Take your .cu file and use scp to transfer it over to your VM. Build it with nvcc, then run it! It's as easy as that.

Friday, July 15, 2016

Microsoft Bot Framework: Using LUIS

What is LUIS?

LUIS (Language Understanding Intelligent Service) is a free service to provide language understanding to applications. This means that when a user sends text to an application, that application can use LUIS to determine what the user said and what they want. Deciphering messages that users send is extremely useful in chat bots so developers do not have to figure out how to parse user messages. In this example we will use LUIS to help run a campsite and allow users to reserve and cancel reservations.

Creating a LUIS Application

Go to luis.ai and sign in or create an account. Then select "New App" -> "New Application." 


Enter in your application info.


How to use LUIS

LUIS has many great documents on how to use it in depth on its site. We will go over the basics here.

Intents

If any of you are Android developers, these intents are not too much different from Android intents. LUIS intents are simply actions that the user might wish to take. For this campsite application, the actions that the user might take are "Book a Campsite" and "Cancel a Reservation." We will create an intent for each of these actions by pressing the + icon next to Intents.


Enter in the name of the intent along with a sample message that could trigger the intent.


Press save, and we have a new intent! In the middle of our screen, something else shows up. 


This is an "Utterance." Utterances are messages that the user might send to your LUIS app. We can teach LUIS by reading some of these messages and telling LUIS which intent they belong to. This message is the phrase we wrote when creating our new intent. This message is obviously a user attempting to book a campsite, so we will tell LUIS that this phrase will result in the "Book Campsite" intent. Ensure the "Book Campsite" intent is selected in the drop down box and press the Submit button.

Next, we will create the Cancel Reservation intent.


Once we have also submitted the Cancel Reservation utterance, we can continue on. 

Entities

Entities are objects within messages that are important. When we are writing the Book Campsite intent, we could say that certain entities could be present in the message. These could be things like DateTimes for the reservation start date and reservation end date. We are not going to be using entities in this tutorial for simplicity. There are plenty of guides on how to use entities available on the LUIS help docs.

Publishing our LUIS application

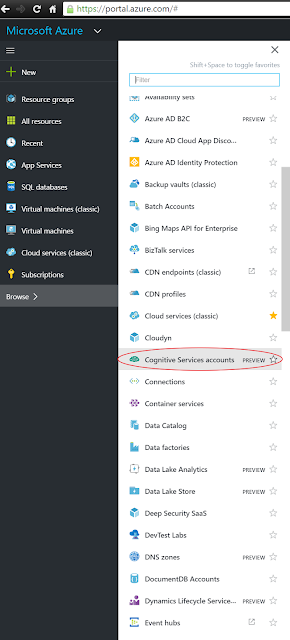
We will be running our LUIS application with Microsoft Azure, so a subscription is needed. First, we want to get a cognitive services key on azure. Go to your azure portal at portal.azure.com. Press "Browse" -> "Cognitive Services accounts." 


We will then have to create a new account with the "Add" button.


Enter in the name of your new account, then set the API type as a LUIS application.


West US is the only location currently available. Choose the free pricing tier, create a resource group if needed, and accept the terms and conditions.


After it is created, there are keys generated in the settings as seen below. Copy one of these keys.


Next, go back to your LUIS application. Open your app settings by pressing the App Settings button on the top left of the screen.


Finally, enter your subscription key as shown below:


Connecting your LUIS app to your Bot

Finally, it is time to get all of this connected with your bot. Microsoft has made this easy by creating a class LuisDialog<T> that you can derive from.

We will be creating a new class called CampsiteLuisDialog that inherits from LuisDialog.

Notice a few things in this class. First, it has a LuisModel attribute. This attribute lets the class connect with you LUIS. Enter your LUIS app id and subscription key from Azure here. They should match your App Settings in your LUIS app.

Next, we will create callback methods for LUIS intents. For each intent in LUIS, we need a corresponding method in this class. For example, here is a method for Book Campsite.

Notice the attribute LuisIntent on this method. That means that this method corresponds to the LUIS intent of "Book Campsite."

Finally, we need to launch the CampingLuisDialog for any users who communicate with our bot.

Let's edit our POST in MessagesController to return a new CampingLuisDialog for any messages arriving at our bot.


The main part of the code above is the line

Conversation.SendAsync(activity, () => new CampingLuisDialog());

This takes the activity sent to us, and returns a new CampingLuisDialog to the user. This dialog then becomes the main contact with the user instead of MessagesController. The user's message is then sent to LUIS, and the corresponding intent callback method on our LuisDialog is called. Once we know what the user wants, we can respond however we want!

Here is a diagram of how the messages are sent for the first message the user sends.


Once the Dialog has been created, it is where all new messages from the user are sent until the dialog is closed. The next messages from the user will get sent directly to the dialog instead of getting routed through the MessagesController.


The important part of this is using context.Wait(MessageReceived) at the end of your LUIS callback. This tells the dialog to wait for a new message and to handle that message as well.

Microsoft Bot Framework: Uploading to Azure

Setting up Azure

Uploading your app to Azure is incredibly simple. To begin, right click on your project in visual studio and select "Publish."


Your can then either select a Web App or an API app. I will be creating a Web App for this tutorial.


You will then have to select an Azure subscription. You will need to create a new Web App, so select the "New" button.


Select a web app name. This will be the domain name for your bot. You can then create a new app service plan, resource group, region, and database if you need one.


Once this is finished, everything should be automatically created for you. The next page should show some of this generated info such as your username, password, and site name.


Once that is finished, hit the "Publish" button, and you're done!

Using your bot in Azure

Using a bot in Azure takes a bit more effort than simply uploading it. The first thing that needs to be done is to create a new bot in the Microsoft Bot Directory. This can be found here: https://dev.botframework.com/bots. After signing in with your Microsoft ID, select "Register a Bot."


After filling in the required information about the bot, the app must be configured. The messaging endpoint will be the url of your bot in azure, followed by "api/messages."  In my case, this was "https://thatconferencebot.azurewebsites.net/api/messages." Click Create Microsoft App ID and password.

IMPORTANT: Use https in your address instead of http. Using http will result in a 401 error when trying to communicate with your bot.


This will create a new App Id for your bot.


Select "Generate a password to continue." Save this password somewhere secure since it will never be shown again. Also note your App ID since you will need it later. The remaining fields with an asterisk also need to be filled in. The URLs don't have to be real until you publish your app. For now, you can enter in any URL in fields such as "Privacy Statement" and "Terms of Use." 


Select "Register." This should finish the registration of the bot and display a page showing an overview of the bot. 

After this, the newly created App ID and Password must be entered in the bot's Web.config. Add the values in as shown below:


After this is done, re-publish the bot as done before. All of the information should already be saved, so pressed the "Publish" button should automatically upload the new bot.

Once the new bot is uploaded, return to the bot directory with the newly created bot. On the bottom left of the screen is a button labeled "Test."


Pressing this button will verify that the connection between the bot connector and the bot running in Azure works correctly. If everything is set up correctly, a messaging saying "endpoint authorization succeeded" should display.

Testing the bot in Azure

Using the Bot Framework Emulator with your bot in azure takes a bit more work. Replacing the "Bot URL" with the url of a bot in azure will result in an error message:


Fortunately, this error message is very useful. It says to download a tool called ngrok found here and run it with "ngrok http -host-header=rewrite 9000." Simply download the exe file, open a command promp, and run that same command.


After running this command, ngrok should display a url that forwards to your port 9000.


Copy this url and paste it into your emulator.


After doing this, the error should disappear from the emulator. Now all you have to do is enter your app id and password on the right side of the emulator. If everything was done correctly, no errors should show up in any of the boxes.


Everything should now work exactly like before, except it is now running in Azure! Now you can integrate your bot into channels like Slack, Twilio, and more. 

Microsoft Bot Framework: Getting Started

Required Software:

1) Visual Studio 2015
2) Bot builder template - save the zip to your Visual Studio 2015 templates directory (%USERPROFILE%\Documents\Visual Studio 2015\Templates\ProjectTemplates\Visual C#\)

Creating your app

Create your app by going to File->New->Project in Visual Studio. Select Bot Application.


Let's take a look at some of the code that comes with the template. The interesting part is going to be in MessagesController.cs:
You'll notice that this looks very similar to an ASP.NET WebApi project -- that's because it is. This is a WebApi Controller with a simple POST method. The post takes an Activity object and return an HttpResponseMessage.

This Activity object is simply the message that the user is sending to the bot. The message that the user is sending is contained in the Text property. You will also notice that there is a check on activity.Type. We'll get more into this later, but this is simply a check as to whether this message is a message from the user, or a system message (such as an alert that the user is typing).

The next line of code creates a ConnectorClient. This is an object representing the connection between the bot and a particular user. This connection can hold multiple conversations, each consisting of multiple activities.

Once we have the user's message and the connection, a reply is generated for the user. This reply simply returns a string containing the user's message and the length of that message. This reply is generated with "activity.CreateReply()," and it is sent back to the user via "connector.Conversations.ReplyToActivityAsync()."

Let's get this application running and test it out. Launch the application using your browser of choice. I am using Google Chrome for this example.


The browser window should look similar to this:


Note the port used at the end of the url. After the bot is running, we want to connect a chat client to it. The easiest way to test it is to use the Microsoft Bot Emulator. Change the "Bot Url" value to use the port that your bot is running on. In this case, mine was running on 3979. The full url should be "http://localhost:XXXX/api/messages."


Once this is finished, type a message at the bottom of the emulator, and send it to your bot!
You should quickly get a response.


When you send the message, you can see the json on the right side. Note that this json can be hard to see sometimes since it is quickly replaced by the reply.


Notice that this json is the same Activity object that we use in the POST method in MessagesController.cs. The Type and Text are easily visible.


Now we have a fully working bot! Move on to uploading your app to Azure, or integrate luis into your bot.

Thursday, January 23, 2014

Rust Introduction: Part 2

Getting User Input

Getting user input is something many programs will have to do. Most languages offer a very simple way to do it. Rust is no different. In order to read a line from a user you can simply use:

let input = io::stdin().read_line();

This will read in a line of text and store it in a variable as a string. Now, what if you want to read in an integer? In many languages you can simply call a method to parse a string and convert it to a integer. Rust has a solution just like this:

let number = int::from_str(string);

This works fine if the string can actually be converted into an integer. There is always a chance that the string will not be a number though. You may expect this int::from_str() to throw an exception in this case. You can then catch this exception and handle it accordingly. Rust does things a little differently though, leading to my next point.

There are no nullable pointers

Null reference exceptions are a very common occurrence in languages like C and its family. Newer languages have tried to help prevent this with increased protection on pointers. Rust takes this protection even further by not allowing null pointers at all.

Now there are times where a null value is very useful. For this reason, Rust does include a nullable type, similar to the "?" after a type in C# (e.g. int?). Rust's version of a nullable type is called an Option.

An Option is a type that either does or does not have a value. If it does not have a value, then it simply contains the word "None." If it does have a value, then it contains that value, which you can access with the word "Some." 

An option is defined like this:


pub enum Option<T>
{
    None,
    Some(T),
}


If we take this knowledge and combine it with our knowledge of a match (switch) statement, we can easily extract a value from this option, and handle it accordingly if it has no value.


match stringOption
{
    None => return "no value",
    Some(x) => return x
}


Creating Classes

There is no actual "class" type in Rust. Instead, you must use a struct and an impleme

Thursday, May 2, 2013

Rust Introduction: Part 1

This week, I found myself looking for a programming language to do a school project for. After stumbling around for a few hours, I noticed people on Reddit talking about a language I had never heard of before. Interested, but skeptical, I clicked on a link. The first thing I noticed was that this language was being written mostly by Mozilla, which meant I could count on it to be quality work. As I read on, I became increasingly impressed by the cool features and utility that it allowed. Soon after, I had decided to do my project using Rust.

Rust is a "curly-brace, block-structured expression language." Rust, at a basic level, looks very similar to C and its family of languages. The curly braces are used the same way, semicolons are used at the end of statements (except in a few cases), and it has many of the same control structures. Once you dive in, you will find that much of the syntax is quite a bit different though. This is the functional  side of the language shining through. Throughout all of this, you will find that Rust is still a very young language that is still changing daily.  This poses a few problems, such as a lack of tutorials and StackOverflow questions, but the benefits of Rust far outweigh these problems.

Setting up

On most unix systems:

git clone git://github.com/mozilla/rust.git
cd rust
git checkout incoming
./configure
make
sudo make install

Your First Program

Writing your first program is very simple. You simply define a function called main.

You can then compile the code with the following command:
rustc HelloWorld.rs

which then creates an executable file named HelloWorld that you can run like normal (./HelloWorld).

Looking at the code, you will see that methods are declared with "fn." After that, it looks a lot like C with the method name followed by a list of arguments and curly braces.

Pointers

Having a strong java and C# background, I was not the best at using pointers. Aside from a few college classes in C++, I have barely used it. This is one of the reasons I like Rust so much - it forces you to manage your memory effectively.

This program merely creates a pointer to an integer, then prints it out the the screen. Using ~ will create a pointer, and * will de-reference it. This is not the only way to create a pointer though. In Rust, there are actually three different ways to create a pointer: ~, @, and &. Rust calls these "boxes," and they all differ by how a certain variable owns the object it points to.

When you declare a variable as usual, let x = 0, it places this memory on the stack. This means when the data gets copied, the entire structure gets copied as well. While this is not a problem for smaller variables, sometimes it is better to create a box on the heap and only hold a pointer to it. This is where the different types of pointers come in.

~
Using ~ will give you an "owned" box. This means that it inherits the lifetime and mutability of its owner. In other words, if you declare a box with ~, then that object can only ever have one owner at a timer. If, for example, I were to do this: 
The compilation would fail with the error message: "error: use of moved value: `x.`" Since x gave its "rights" to its box to y, it can no longer reference that box.

@
What if you want to have two pointers to the same box though? That's where @, the "managed" pointer comes in. If you try writing the same code as before:
It works! The console prints out "0" just as you would expect.

&
When you have a ~ box, but you want to pass it into a method, you can use &, a "borrowed" pointer. The name is pretty self-explanatory. It takes a pointer and makes the box its own for a short while before handing it back.
In add(), input is a parameter that will borrow an integer box. It will then use that box as if it was its own box. At the end of the method, it will hand the box back to x.

I added a few more things in that last section of code - namely another method. It is done very similar to C, except that the return type is listed after the list of arguments and preceded by "->"

You have also probably noticed the call to fmt!() in the println() method. This is very similar to a String.format() found in other languages. %s denotes a string, %d denotes a number, and a few other directives. %? is interesting in that it will attempt to display any type, no matter what it is.

Control

Control statements look very similar to C.
What is interesting about Rust is that you do not need semicolons. A method will automatically return the last statement that is executed in the method if it does not have a semicolon at the end of the line. A semicolon at the end of the method is the same thing as returning nil.

This method is exactly the same as the original method. You can even do the same thing with variable assignments:


Pattern Matching

The equivalent to a switch statement in Rust is called "match."

This behaves exactly as you think it would. "_" will match any pattern.

This is the end of part1 of my Rust tutorial. Part 2 will come soon!